Principle 16.2.3. Self-Referential Object.
A self-referential object is one that contains an instance variable that refers to an object of the same class.

new operator you get back a reference to the object that you then can assign to a reference variable. In the following example, b is a reference to a JButton:
JButton b = new JButton();
public class Student {
     private String name;
}
name is a reference to a String object.
Node:
public class Node {
     private String name;
     private Node next;
}
String object, each Node object contains a reference to another Node object. The next variable is often called a link because it is used to link together two Node objects. For example, Figure 16.2.1 provides an illustration of a linked list of Node s.
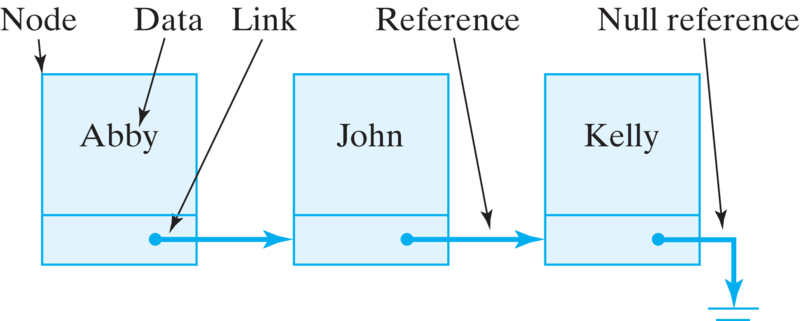
null link.next variables in each Node, we can chain together arbitrarily long lists of objects. Therefore, we will want to add methods to our Node class that enable us to manipulate a Node’s next variable (Figure 16.2.2). By assigning it a reference to another Node, we can link two Node s together. By retrieving the link’s value, we can find the next Node in the list.
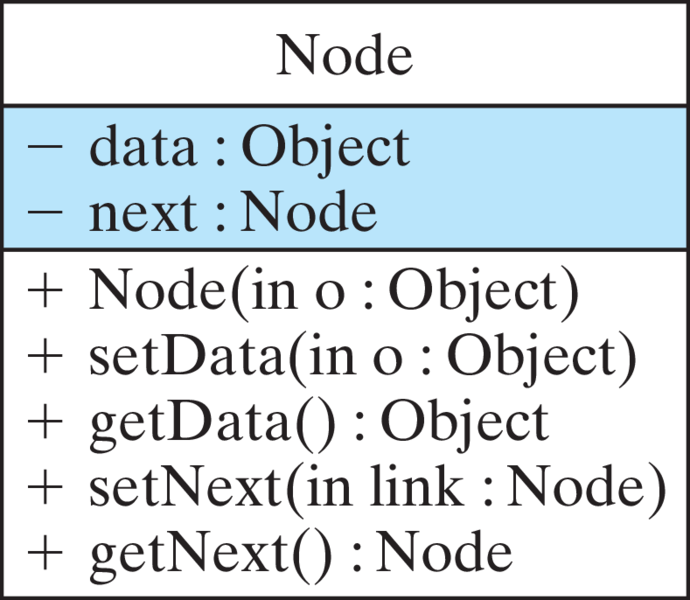
Node class.Node stores some data. In this example, the data is a single String. But there’s no real limit to the amount and type of data that can be stored in a linked list. Therefore, in addition to methods that manipulate a Node’s link, we will also want methods to manipulate its data. These points suggest the following basic design for a Node:
public class Node {
     private Object data;
     private Node next;
     public Node(Object obj);          // Constructor
     public void setData(Object obj);  // Data access
     public Object getData();
     public void setNext(Node link);   // Link access
     public Node getNext();
} // Node
Node’s data in the most general possible way: as a reference to an Object. Because the Object class is the root of Java’s entire class hierarchy, an Object can encompass any kind of data. By using Java’s wrapper classes, such as Integer and Double, a Node’s data can even include primitive data.
Node will have data access methods and link access methods. The data access methods differ, depending on the type of data, but the link access methods will generally be the same.
Node whose data consist of the String“Hello.”
Node node = new Node(new String("Hello"));
Node node = new Node("Hello");
Node node = new Node(new String("hello"));
Node node = new Node("hello");
Node constructor has the following signature: public Node(Object obj).
Integer wrapper class has a constructor with the following signature: Integer(int value). Which of the following statements correctly creates a new Node whose data is the value 100.
Node node = new Node(100);
int is not an Object.Node node = new Node(new Integer(100));
Integer wrapper.Node node = new Node("100");
Node node = new int(100);
Integer wrapper.Node constructor has the following signature: public Node(Object obj).
PhoneListNode class that can be used to implement a phone list (Figure 16.2.5). This definition will be a straightforward specialization of the generic Node list defined in the previous section. Each element of the phone list will consist of a person’s name and phone number. These will be the node’s data and can be stored in two String variables. To access these data, we will provide a constructor and a basic set of access methods. Thus, we have the definition shown in Listing 16.2.6.
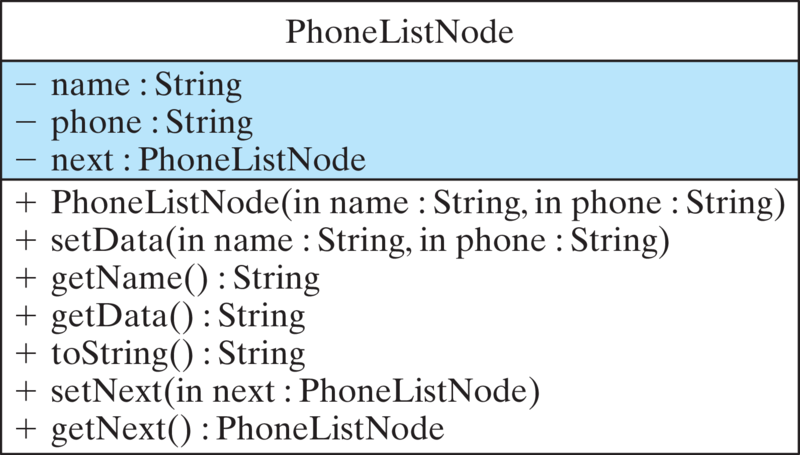
PhoneListNode class.PhoneListNode class.public class PhoneListNode {
private String name;
private String phone;
private PhoneListNode next;
public PhoneListNode(String s1, String s2) {
name = s1;
phone = s2;
next = null;
} // PhoneListNode()
public void setData(String s1, String s2) {
name = s1;
phone = s2;
} // setData()
public String getName() {
return name;
} // getName()
public String getData() {
return name + " " + phone;
} // getData()
public String toString() {
return name + " " + phone;
} // toString()
public void setNext(PhoneListNode nextPtr) {
next = nextPtr;
} // setNext()
public PhoneListNode getNext() {
return next;
} // getNext()
} // PhoneListNode
next to null, which means that it refers to no object.
null reference to refer to an object. This usually means the reference has not been successfully initialized.
setNext() and getNext() methods—which are also simple to implement. Because this is a PhoneListNode, these methods take PhoneListNode as a parameter and return type, respectively. Given a reference to a PhoneListNode, the setNext() method assigns it to next. The getNext() method simply returns the value of its next link.
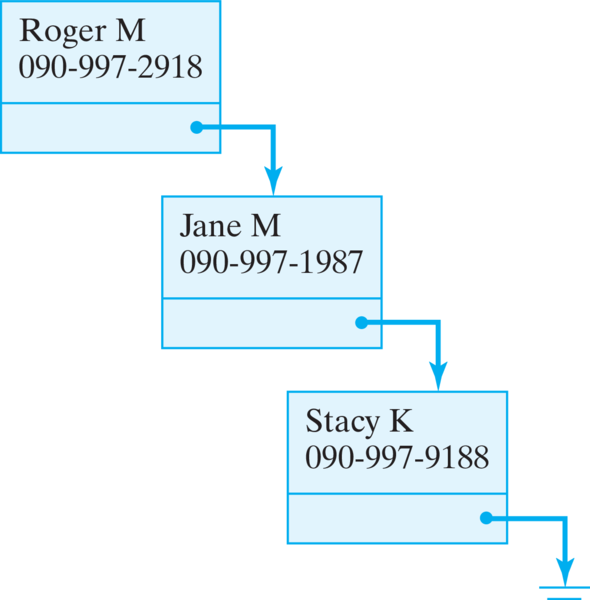
PhoneListNode node1 = new PhoneListNode("Roger M","090-997-2918");
PhoneListNode node2 = new PhoneListNode("Jane M","090-997-1987");
PhoneListNode node3 = new PhoneListNode("Stacy K","090-997-9188");
node1.setNext(node2);
node2.setNext(node3);
PhoneListNode node4 = new PhoneListNode("gary g","201-119-8765");
node3.setNext(node4);
nodeptr is a reference to the last element of a linked list of PhoneListNodes. Which of the following will correctly create a new PhoneListNode for “Bill C” with phone number “111-202-3331” and link it into the end of the list?
PhoneListNode newNode = new PhoneListNode("Bill C", "111-202-3331");
nodeptr.setNext(newNode);
newNode and populate it with the correct data.PhoneListNode newNode = new PhoneListNode(Bill C, 111-202-3331);
nodeptr.setNext(newNode);
PhoneListNode newNode = new PhoneListNode("Bill C", "111-202-3331");
nodeptr.setNext(newNode);
Nodes that make a list, we must define a class containing methods to manipulate the list. This class will include the insert, access, and remove methods. It must also contain a reference to the list itself. This leads to the basic design shown in Figure 16.2.10. Because this is a list of PhoneListNode s, we need a PhoneListNode reference to point to the list, which is the purpose of the head variable.
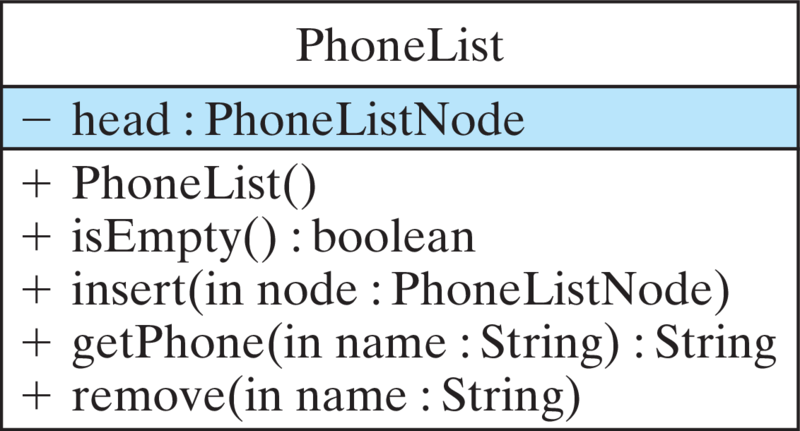
PhoneList class has a reference to the first node of the list (head) and methods to insert, remove, and look up information.PhoneList class is shown in Listing 16.2.12. As you can see there, when a new PhoneList instance is constructed, head is initialized to null, meaning the list is initially empty. Since we will frequently want to test whether the list is empty, we define the booleanisEmpty() method for that purpose. As you can see, its definition says that a list is empty when the reference to the head of this list is null.
nullReference.
null reference is useful for defining limit cases, such as an empty list or an uninstantiated object.
PhoneList class.public class PhoneList {
private PhoneListNode head;
public PhoneList() {
head = null; // Start with empty list
}
public boolean isEmpty() { // Defines an empty list
return head == null;
}
public void insert(PhoneListNode node) { }
public String getPhone(String name) { }
public String remove(String name) { }
public void print() { }
} // PhoneList
insert() method will have the task of inserting new PhoneListNodes into the list. There are a number of ways to do this. The node could be inserted at the beginning or at the end of the list, or in alphabetical order, or possibly in other ways. As we’ll see, it is easiest to insert a new node at the head of the list. But for this example, let’s develop a method that inserts the node at the end of the list.
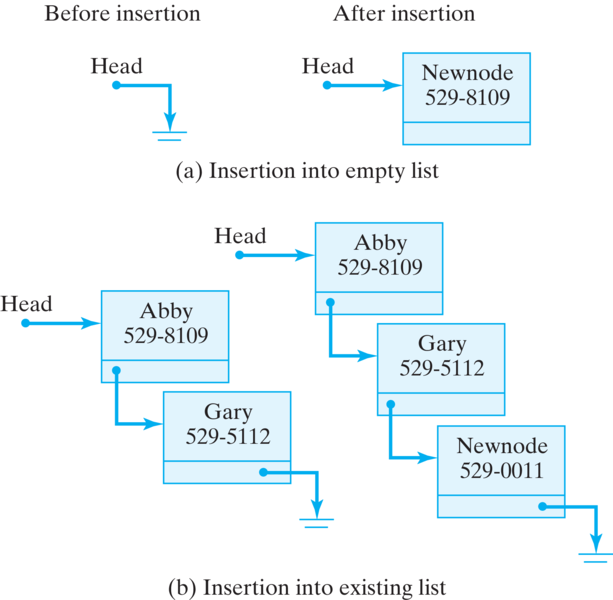
head. (b) The list is not empty, so the insertion takes place at the end of the list.head to point to the node [Figure 16.2.13(a)]. Second, if the list is not empty, we must move through, or traverse, the links of the list until we find the last node and insert the new node after it [Figure 16.2.13(b)]. In this case, we want to set the next variable of the last node to point to the new node. This gives us the following algorithm:
public void insert(PhoneListNode newNode) {
  if (isEmpty())
    head = newNode;                   // Insert at head of list
  else {
    PhoneListNode current = head;     // Start traversal at head
    while (current.getNext() != null) // While not at the last node
      current = current.getNext();    //   go to next node
    current.setNext( newNode );       // Do the insertion
  } // else
} // insert()
next variables are non-null. So when a node’s next variable is null, that indicates the end of the list—there’s no next node. Thus, our algorithm begins by checking if the list is empty. If so, we assign head the reference to newNode, the PhoneListNode that’s being inserted.
current, which will always point to the current node. It’s important to understand the while loop used here:
PhoneListNode current = head;       // Initializer
while (current.getNext() != null)   // Entry condition
     current = current.getNext();    // Updater
current, is initialized by setting it to point to the head of the list. The entry condition tests whether the next link, leading out of current, is null(Figure 16.2.14). That is, when the link coming out of a node is null, then that node is the last node in the list [Figure 16.2.14(c)]. Inside the while loop, the update expression simply assigns the next node to current. In that way, current will point to each successive node until the last node is found. It’s very important that the loop exits when current.getNext() is null—that is, when the next pointer of the current node is null. That way current is pointing to the last node and can be used to set its next variable to the node being inserted [Figure 16.2.14(d)]. Thus, after the loop is exited, current still points to the last node. At that point, the setNext() method is used to link newNode into the list as the new last node.
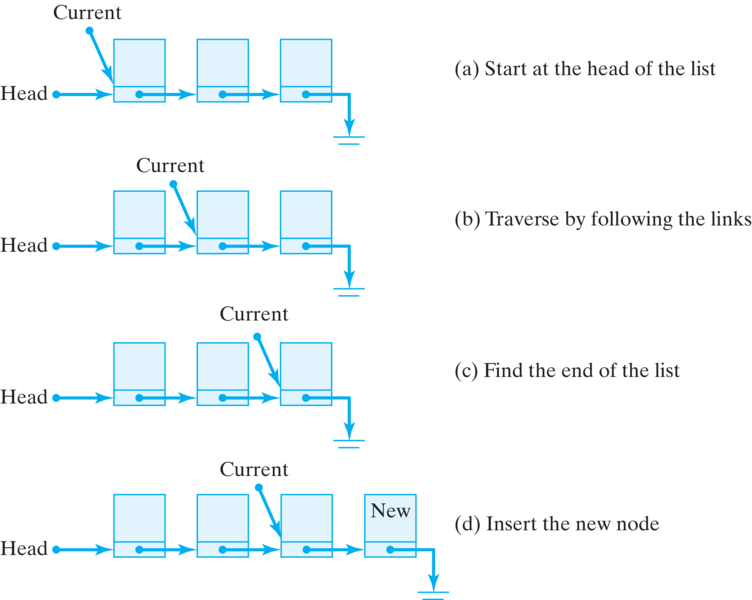
current is used to traverse the list to find its end.print() method also uses a traversal strategy to print the data from each node of the list. Here again it is necessary to test whether the list is empty. If so, we must print an error message. (This would be a good place to throw a programmer-defined exception, such as an EmptyListException.) If the list is not empty, then we use a temporary variable to traverse the list, printing each node’s data along the way:
public void print() {
  if (isEmpty())
     System.out.println("Phone list is empty");
  PhoneListNode current = head;               // Start traversal at head
  while (current != null) {                   // While not end of list
    System.out.println( current.toString() ); //  print data
    current = current.getNext();              //  go to next node
  }
} // print()
insert() method. In this case, we exit the loop when current becomes null; there’s no action to be taken after the loop is exited. The printing takes place within the loop. Thus, in this case, the entry condition, (current != null), signifies that the task has been completed.
p.getNext() == null. If you have finished processing the nodes when the loop exits, your exit condition should be p == null.
PhoneList. Here again we start at the head of the list and traverse through the next links until we find the node containing the desired phone number. This method takes the name of the person as a parameter. There are three cases to worry about: (1) The list is empty; (2) the normal case where the person named is found in the list; and (3) the person named is not in the list. Because the method returns a String, we can return error messages in the first and third cases:
public String getPhone(String name) {
  if (isEmpty())                    // Case 1: Empty list
    return "Phone list is empty";
  else {
     PhoneListNode current = head;
     while ((current.getNext() != null) &&
                 (!current.getName().equals(name)))
        current = current.getNext();
     if (current.getName().equals(name))
        return current.getData(); // Case 2: Found name
     else                        // Case 3: No such person
        return ("Sorry.  No entry for " + name);
  } // else
} // getPhone()
insert() method, when the loop exits, we need a reference to the current node so that we can print its phone number [current.getData()]. But here there are three ways to exit the loop: (1) We reach the end of the list without finding the named person; (2) we find the named person in the interior of the list; or (3) we find the named person in the last node of the list. In any case, it is necessary to test whether the name was found or not after the loop is exited. Then appropriate action can be taken.
getPhone() were stated as ((current.getNext() != null) || (!current.getName().equals(name)))
PhoneList we use the person’s name to identify the node, and we return a String that can be used to report either success or failure. There are four cases to worry about in designing this algorithm: (1) The list is empty, (2) the first node is being removed, (3) some other node is being removed, and (4) the named person is not in the list. The same traversal strategy we used in getPhone() is used here, with the same basic while loop for cases 3 and 4.
remove() method.public String remove(String name) { // Remove an entry by name
if (isEmpty()) // Case 1: empty list
return "Phone list is empty";
PhoneListNode current = head; // Initialize traverse
PhoneListNode previous = null;
if (current.getName().equals(name)) { // Case 2: remove first node
head = current.getNext();
return "Removed " + current.toString() ;
}
// Start traverse
while ((current.getNext() != null) &&
(!current.getName().equals(name))) {
previous = current;
current = current.getNext();
}
if (current.getName().equals(name)) { // Case 3: remove named node
previous.setNext(current.getNext());
return "Removed " + current.toString();
} else
return ("Sorry. No entry for " + name); // Case 4: node not found
} // remove()
current as the traversal variable. If the named node is the first node, we simply need to set head to current.getNext(), which has the effect of making head point to the second node in the list [Figure 16.2.19(a)]. Once the node is cut out from the chain of links, there will be no further reference to it. In this case, Java will recapture the memory it uses when it does garbage collection.

previous and current. They proceed together down the list, with previous always pointing to the node just before the current node. The reason, of course, is that to remove the current node, you need to adjust the link pointing to it contained in the previous node [Figure 16.2.19(b)]. That is, the new value of previous.next will be the current value of current.next. We use the getNext() and setNext() methods to effect this change:
previous.setNext(current.getNext());
main() program in Listing 16.2.20 illustrates the kinds of tests that should be performed. This method could be incorporated directly into the PhoneList class, or it could be made part of a separate class.
main() method containing a set of tests for the PhoneList class.public static void main(String argv[]) {
// Create list and insert nodes
PhoneList list = new PhoneList();
list.insert( new PhoneListNode("Roger M", "997-0020"));
list.insert( new PhoneListNode("Roger W", "997-0086"));
list.insert( new PhoneListNode("Rich P", "997-0010"));
list.insert( new PhoneListNode("Jane M", "997-2101"));
list.insert( new PhoneListNode("Stacy K", "997-2517"));
// Test whether insertions worked
System.out.println( "Phone Directory" );
list.print();
// Test whether lookups work
System.out.println("Looking up numbers by name");
System.out.println(list.getPhone("Roger M"));
System.out.println(list.getPhone("Rich P"));
System.out.println(list.getPhone("Stacy K"));
System.out.println(list.getPhone("Mary P"));
System.out.println(list.remove("Rich P"));
System.out.println("Phone Directory");
list.print();
// Test removals, printing list after each removal
System.out.println(list.remove("Roger M"));
System.out.println("Phone Directory");
list.print();
System.out.println(list.remove("Stacy K"));
System.out.println("Phone Directory");
list.print();
System.out.println(list.remove("Jane M"));
System.out.println("Phone Directory");
list.print();
System.out.println(list.remove("Jane M"));
System.out.println("Phone Directory");
list.print();
System.out.println(list.remove("Roger W"));
System.out.println("Phone Directory");
list.print();
System.out.println(list.remove("Roger W"));
System.out.println("Phone Directory");
list.print();
} // main()
PhoneList app is given here. Experiment with it to see how it works. Then add a new node to the list with your name and number. Print the list. Then remove your entry and print again.
PhoneList that shows that new elements can be inserted into a list after all of its previous nodes have been removed.
