Principle 4.4.5. EFFECTIVE DESIGN: Specialization.
By creating a subclass of
JFrame we can specialize its functionality for our application.
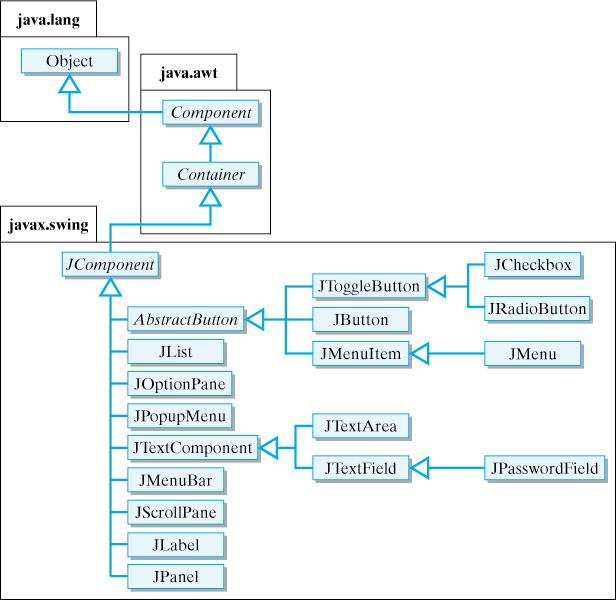
java.awt package and the newer javax.swing package. For the most part, the Swing classes supersede the AWT classes. For example, the java.awt.Button class is superseded by the javax.swing.JButton class, and the java.awt.TextField class is superseded by the javax.swing.JTextField class. As these examples show, the newer Swing components add an initial ’J’ to the names of their corresponding AWT counterparts.
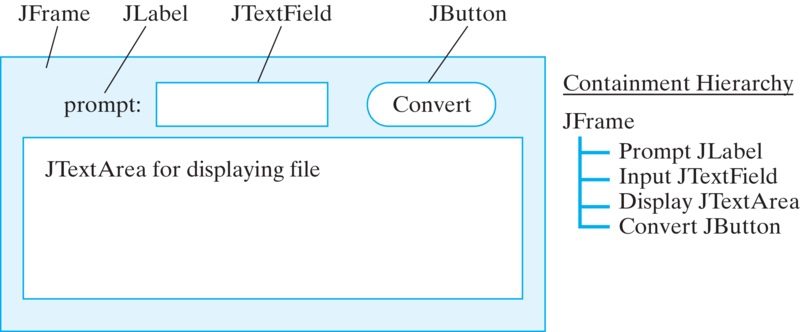
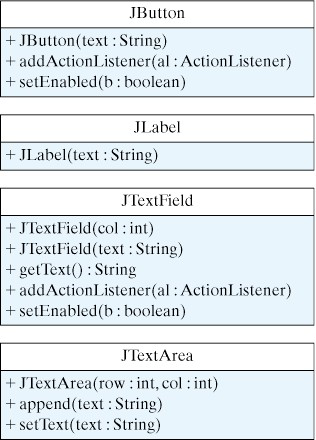
JLabel is simply a string of text displayed on the GUI, used here as a prompt. A JTextField is an input element that can hold a single line of text. In this case, the user has input his name. A JTextArea is an output component that can display multiple lines of text. In this example, it displays a simple greeting. A JButton is a labeled control element, which is an element that allows the user to control the interaction with the program. In this example, the user will be greeted by the name input into the JTextField, whenever the JButton is clicked. As we will learn, clicking on the JButton causes an event to occur, which leads the program to take the action of displaying the greeting. Finally, all of these components are contained in a JFrame, which is a top-level container. A container is a GUI component that can contain other GUI components.
javax.swing package.Button can only have a string as its label, a Swing JButton can use an image as a label. (See Chapter 13 for a detailed discussion of the MVC architecture.)
JButton should look and act the same way regardless of platform, an AWT Button would have a different implementation, and hence a different look and feel, on a Macintosh and on a Windows system. In this book, we will use the new Swing classes in our programs.
toString() method from the Object class. The lesson there was that an object in a subclass can either use or override any public method defined in any of its superclasses. In order to implement GUI programs, we need to look at another way to employ inheritance. In particular, we need to learn how to define a new class by extending an existing class.
Object. Thus, the GreeterApp class that we defined earlier in this chapter is a subclass of Object. We can make the relationship between GreeterApp and Object explicit by using the extends keyword when we define the GreeterApp class:
public class GreeterApp extends Object { ... }
extends keyword is used to specify the subclass/superclass relationships that hold in the Java class hierarchy. We sometimes refer to the subclass/superclass relationship as the isa relationship, in the sense that a horse isa mammal, and a mammal isa animal. Thus, the extends keyword is used to define the isa relationship among the objects in the Java class hierarchy.
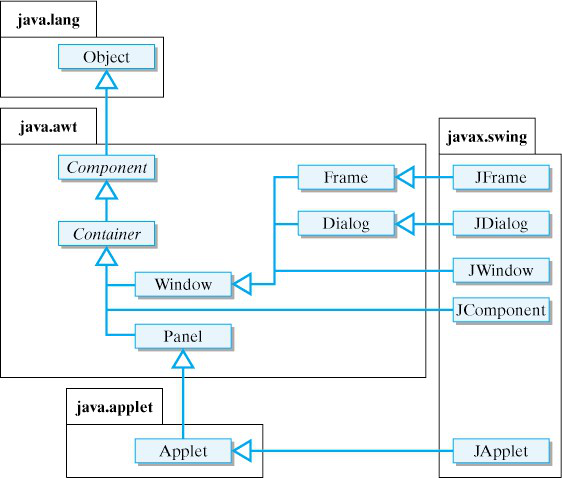
javax.swing.JFrame class, which represents a top-level window, is a subclass of java.awt.Frame, and the javax.swing.JPanel is a subclass of java.awt.Panel. We can see from this figure that a JFrameisaFrame and an FrameisaWindow and a WindowisaContainer. These subclass/superclass relationships are created in their respective class definitions by using the extends keyword as follows:
public class JFrame extends Frame { ... }
public class Frame extends Window { ... }
public class Window extends Container { ... }
Container class. This means that Swing components are Container s. They inherit the functionality of the Container class. So Swing components can contain other GUI components. That is why a JButton can contain an image.
JFrame, JApplet and JDialog. The JApplet class is no longer supported by current browsers and was deprecated by Java SE 9 in 2017. For our basic GUI, we will use a JFrame as the top-level window for stand alone applications.
JFrame encapsulates the basic functionality of a top-level window. It has what is called a content pane, to which other Swing components, such as buttons and text fields, can be added. Also, it comes with enough built-in functionality to respond to certain basic commands, such as when the user adjusts its size or closes it.
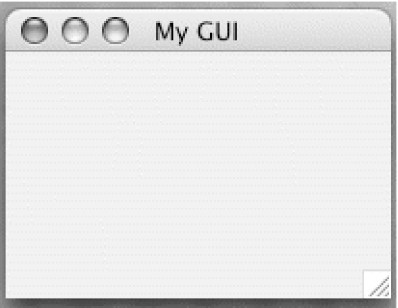
extends keyword to define SimpleGUI as a subclass of JFrame. As a subclass, SimpleGUI inherits all of the functionality of a JFrame( Figure 4.4.6) . That is, it can contain other GUI components. It knows how to resize and close itself, and so on.
import javax.swing.*;
public class SimpleGUI extends JFrame
{
    public SimpleGUI(String title)
    {   setSize(200,150);
        setLocation(100, 150);
        setTitle(title);
        setVisible(true); // Displays the JFrame
    } // SimpleGUI()
    public static void main(String args[])
    {   new SimpleGUI("My GUI");
    } // main()
  } // SimpleGUI class
JFrame, rather than just use a JFrame instance, is because we want eventually to give our subclass additional functionality that is specialized for our application.
JFrame we can specialize its functionality for our application.
SimpleGUI’s main() program creates an instance of SimpleGUI by invoking its constructor. There is no need to use a variable here because there are no further references to this object in this class. However, simply constructing a SimpleGUI will not cause it to appear on the Java console. For that to happen, it is necessary to give it a size and to call its setVisible() method. This is done in the constructor method.
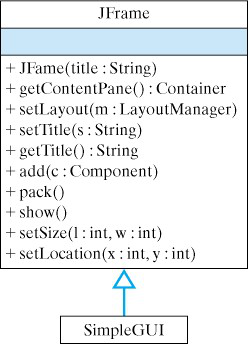
SimpleGUI is a subclass of JFrame.JFrame. Figure 4.4.6 shows some of the methods that SimpleGUI inherits from JFrame. We use the setSize() and setLocation() methods to set SimpleGUI’s size and location. We use the setTitle() method to set its title. And we use the setVisible() method to cause it to appear on the console.
JTextField would be an example of an input component. The user can type text into the text field, which can then be transmitted into the program. A JTextArea is an example of an output component. The program can display text in the text area. Control components enable the user to control the actions of the program. A JButton would be an example of a control component. It can be associated with an action that can be initiated whenever the user clicks it. We might also consider a JLabel to be an output component, because we can use it to prompt the user as to what type of actions to take.
GreeterGUI, to suggest its interdependence with the same Greeter computational object that we used with the command-line interface.
JTextField will be used to accept user input.
JTextArea will serve to display the program’s output.
JButton will allow the user to request the greeting.
JLabel will serve as a prompt for the JTextField.
GreeterGUI program below.
JTextArea, JTextField, JButton, and JLabel components.
// Declare instance variables for the components
private JLabel prompt;
private JTextField inField;
private JTextArea display;
private JButton goButton;

// Instantiate the components
prompt = new JLabel("Please type your name here: ");
inField = new JTextField(10);   // 10 chars wide
display = new JTextArea(5, 20);// 5 rows x 20 columns
goButton = new JButton("Click here for a greeting!");
JTextField with a size of 10. That means it can display 10 characters of input. We create a JTextArea with 5 rows of text, each 20 characters wide. We create a JButton with a simple text prompt meant to inform the user of how to use the button.
Container class has several add() methods that can be used to insert components into the container:
add(Component comp)  // add comp to end of  container
add(Component comp, int index)  // add comp at index
add(String region, Component comp) //add comp at region
add() method to use depends on how we want to arrange the components in the container. The layout of a container is controlled by its default layout manager, an object associated with the container that determines the sizing and the arrangement of its contained components. We used the default FlowLayout where components are added in order:
setLayout(new FlowLayout(FlowLayout.LEFT));
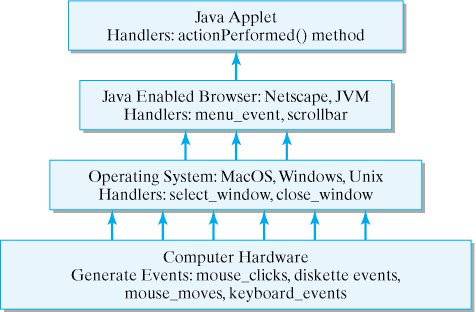
Repeat forever or until the program is stopped
    Listen for events
    If event-A occurs, handle it with event-A-handler
    If event-B occurs, handle it with event-B-handler
     ...
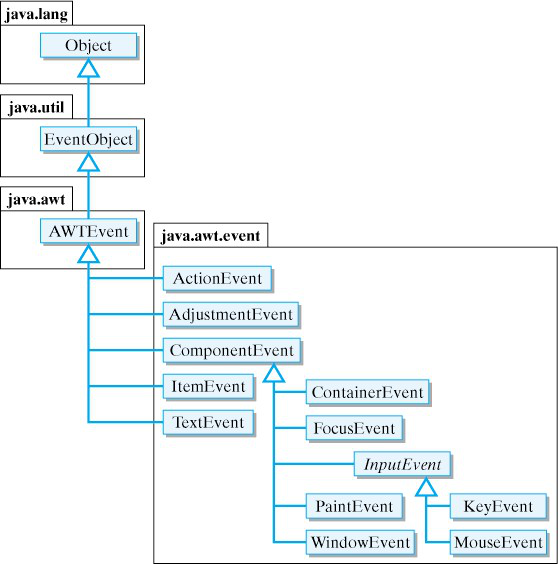
java.awt.event package. In most cases, the names of the event classes are suggestive of their roles. Thus, a MouseEvent occurs when the mouse is moved. A KeyEvent occurs when the keyboard is used. The only event that our program needs to listen for is an ActionEvent, the type of event that occurs when the user clicks the JButton.
JButton, Java will create an ActionEvent object. This object contains important information about the event, such as the time that the event occurred and the object, such as a JButton, that was the locus of the event. For our application, when the user clicks the JButton, the program should input the user’s name from the JTextField and display a greeting, such as “Hi John nice to meet you” in the JTextArea. That is, we want the program to execute the following code segment:
String name = inField.getText();
display.setText("Hello " + name + "\n");
JTextField.getText() method to get the text that the user typed into the JTextField and stores it in a local variable, name. The second line sets the text in the JTextArea to the concatenation of "Hello " + the value in the name variable + a new line ("\n").
JTextField and JTextArea classes. For our simple GUI, the methods described in Figure 4.4.8 will be sufficient for our needs. However, if you would like to see the other methods available for these and other Swing components, you should check Ch. 13 and Java’s online Swing documentation.
goButton. You know enough Java to understand that we should put that code in a Java method. However, we need a special method in this case, one that will be called automatically by Java whenever the user clicks that button. In other words, we need a special method that the button’s listener knows how to call whenever the button is clicked.
goButton. The name of the method is actionPerformed() and it is part of the ActionListener interface. In this case, an interface is a special Java class that contains only methods and constants (final variables). It cannot contain instance variables. (Be careful to distinguish this kind of interface, a particular type of Java class, form the more general kind of interface, whereby we say that a class’s public methods make up its interface to other objects.) Here’s the definition of the ActionListener interface:
public abstract interface ActionListener
                                extends EventListener
{
  public abstract void actionPerformed(ActionEvent e);
}
interface replaces the keyword class in the definition. Note also that we are declaring this interface to be abstract. An abstract interface or abstract class is one that contains one or more abstract methods. An abstract method is one that consists entirely of its signature; it lacks an implementation—that is, it does not have a method body. Note that the actionPerformed() method in ActionListener places a semicolon where its body is supposed to be.
abstract means that we are leaving its implementation up to the class that implements it. This way, its implementation can be tailored to a particular context, with its signature specifying generally what the method should do. Thus, actionPerformed() should take an ActionEvent object as a parameter and perform some kind of action.
actionPerformed() method can serve as a listener for ActionEvent s. Thus, to create a listener for our JButton, all we need to do is give an implementation of the actionPerformed() method. For our program, the action we want to take when the goButton is clicked, is to greet the user by name. Thus, we want to set things up so that the following actionPerformed() method is called whenever the goButton is clicked:
public void actionPerformed(ActionEvent e)
{
  String name = inField.getText();
  display.setText("Hello " + name + "\n");
 }
actionPerformed() method. That explains what gets done when the button is clicked—namely, the code in actionPerformed() will get executed. But it doesn’t explain how Java knows that it should call this method in the first place. To set that up we must do two further things. We must place the actionPerformed() method in our GreeterGUI class, and we must tell Java that GreeterGUI will be the ActionListener for the goButton.
public class GreeterGUI extends Frame
                               implements ActionListener
{
  private JButton goButton;
  private JTextfield inField;
  private JTextArea display;
  ...
  public GreaterGUI()
  {  ...
     goButton = new JButton("Click here for a greeting!");
     goButton.addActionListener(this);
     ...
  }
  ...
  public void actionPerformed(ActionEvent e)
  {
    String name = inField.getText();
    display.setText("Hello " + name + "\n");
  }
  ...
}
GreeterGUI implements the ActionListener interface in the class header. This means that the class must provide a definition of the actionPerformed() method, which it does. It also means that GreeterGUIisaActionListener. So SimpleGUI is both a JFrame and an ActionListener.
addActionListener() method to associate the listener with the goButton:
goButton.addActionListener(this)
this keyword is a self-reference—that is, it always refers to the object in which it is used. It’s like a person referring to himself by saying “I”. When used here, the this keyword refers to this GreeterGUI. In other words, we are setting things up so that the GreeterGUI will serve as the listener for action events on the goButton.
this keyword always refers to the object that uses it. It is like saying “I” or “me.”
GreeterGUI interface.
GreeterGUI class.import javax.swing.*;
import java.awt.*;
import java.awt.event.*;
public class GreeterGUI extends JFrame implements ActionListener
{
// Declare instance variables for the components
private JLabel prompt;
private JTextField inField;
private JTextArea display;
private JButton goButton;
/* Constructor: set up GUI */
public GreeterGUI()
{
// Instantiate the GUI components
prompt = new JLabel("Please type your name here: ");
inField = new JTextField(10); // 10 chars wide
display = new JTextArea(5, 20);// 5 rows x 20 columns
goButton = new JButton("Click here for a greeting!");
// add the components
setLayout(new FlowLayout(FlowLayout.LEFT));
add(prompt);
add(inField);
add(goButton);
add(display);
// make go button clickable
goButton.addActionListener(this);
// widthxheight of window
setSize(400,200);
// display the JFrame
setVisible(true);
}
/* actionPerformed is called when the button is clicked */
public void actionPerformed(ActionEvent e)
{
String name = inField.getText();
display.setText("Hello " + name + "\n");
}
}
main() method. The main() method can be placed in the GreeterGUI class itself or in a separate class. Here’s an example with the main in a separate class:
public class Main
{  public static void main(String args[])
   {
      GreeterGUI = new GreeterGUI();
   }
}
main() method creates an instance of GreeterGUI. If you prefer, this same main() method can be incorporated directly into the GreeterGUI class.
GreeterGUI. The JTextField can serve both as an input element and as a control element for action events. An ActionEvent is generated whenever the user presses the Return or Enter key in a JTextField. Of course, it will be necessary to designate the inField as an ActionListener in order to take advantage of this feature. Fork the following repl to make the appropriate changes so that the inField can function as both a control and input element. Also, change the welcome message.
