
3.11. 🐢 Exploring the Turtle Module
We already introduced the idea of drawing with turtles. In the next few sections we will delve more deeply into this fun module. The turtle module is designed to help students learning how to program explore programming concepts in a way that is visually fun and interesting. Using turtles also will allow us in later chapters to explore aspects of interactive programming. With turtles, there is a visual output that an end user can view and (as you learn more programming) interact with.
Here is a turtle that starts to draw a dashed line:
Now that you know a bit more about Python, we can explain a bit more about what is going on here.
Line 1 imports the Turtle module. This brings us two new types that we can use: the Turtle type, and the
Screen type.
On line 2, we create and open what the turtle module calls a screen (we would
prefer to call it a window, or in the case of this web version of Python
simply a canvas), which we assign to variable wn. The dot notation turtle.Screen means “The Screen type
that is defined within the turtle module”. Every screen/window
contains a canvas, which is the area inside the window on which we can draw.
In line 3 we create a turtle. Remember that Python is case
sensitive, so the module name, turtle, with a lowercase t, is different from the
type Turtle because of the uppercase T. The variable maya is made to refer to this
turtle.
These first three lines set us up so that we are ready to do some drawing.
In lines 4-8, we instruct the turtle ‘maya’ to draw part of a dashed line. Run the program and trace through lines 5-9 to understand what is happening. The turtle only leaves a trace when the tail (pen) is down. When you create a tutrle, their tail is down by default.
Complete the line …
Modify the program by adding the commands necessary to have maya make a dashed line that goes to the right edge of the canvas. The code will be repetitive. In the next chapter we will learn how to write this code so that it is more efficient!
Check your understanding
- forward()
- No, forward() just moves the turtle in it's current direction.
- forward_penup()
- No, this is not a valid instruction?
- penup()
- Yes, this instruction picks up a pen, and movement after this will not leave a line.
- pendown()
- No, this instruction puts the pen down, and movement instructions after this will draw a line.
What instruction do you give a turtle to allow it to move without drawing?
Maya the turtle is an object and once we have created a turtle object, we can make it perform actions. Objects have methods, things that they can do. We can make use of this by invoking or activating turtle methods. A method is a set of program instructions that are for a specific type of object. Turtle methods are sets of instrutcions that all turtles know how to respond to. Because maya is an object, we use dot notation to call or invoke the turtle methods; maya.forward(50) says to call the forward() method, for the turtle object maya, with the specific distance of 50 units.
In addition to methods — the things an object can do — an object can also
have attributes — (sometimes called properties) which store information about the current state of an object. For example, each
turtle has a color attribute. The method invocation maya.color("red")
will make maya red and the line that maya draws will be red too.
The color of the turtle, the width of its pen(tail), the position of the turtle within the window, which way it is facing, and so on are all part of its current state. Similarly, the window object has a background color which is part of its state.
Quite a number of methods exist that allow us to modify the turtle and window objects. In the example below, we show just a couple and have only commented those lines that are different from the previous example. Note also that we have decided to call our turtle object tess. When we create objects, we can call them whatever we want.
The last line plays a very important role. The wn variable refers to the window shown
above. When we invoke its exitonclick method, the program pauses execution and waits for the user to click the mouse somewhere in the window.
When this click event occurs, the response is to close the turtle window and
exit (stop execution of) the Python program.
Each time we run this program, a new drawing window pops up, and will remain on the screen until we click on it.
Extend this program …
Modify this program so that before it creates the window, it prompts the user to enter the desired background color.It should store the user’s responses in a variable, and modify the color of the window according to the user’s wishes. (Hint: you can find a list of permitted color names at https://www.w3schools.com/colors/colors_names.asp. It includes some quite unusual ones, like “PeachPuff” and “HotPink”.)
Do similar changes to allow the user, at runtime, to set tess’ color.
Do the same for the width of tess’ pen. Hint: your dialog with the user will return a string, but tess’
pensizemethod expects its argument to be anint. That means you need to convert the string to an int before you pass it topensize.
Check your understanding
- It creates a new turtle object that can be used for drawing.
- The line "alex = turtle.Turtle()" is what actually creates the turtle object.
- It defines the module turtle which will allow you to create a Turtle object and draw with it.
- This line imports the module called turtle, which has all the built in functions for drawing on the screen with the Turtle object.
- It makes the turtle draw half of a rectangle on the screen.
- This functionality is performed with the lines: "alex.forward(150)", "lex.left(90)", and "alex.forward(75)"
- Nothing, it is unnecessary.
- If we leave it out, Python will give an error saying that it does not know about the name "turtle" when it reaches the line "wn = turtle.Screen()"
Consider the following code:
import turtle
wn = turtle.Screen()
alex = turtle.Turtle()
alex.forward(150)
alex.left(90)
alex.forward(75)
What does the line “import turtle” do?
- This is simply for clarity. It would also work to just type "Turtle()" instead of "turtle.Turtle()".
- We must specify the name of the module where Python can find the Turtle object.
- The period (.) is what tells Python that we want to invoke a new object.
- The period separates the module name from the object name. The parentheses at the end are what tell Python to invoke a new object.
- The first "turtle" (before the period) tells Python that we are referring to the turtle module, which is where the object "Turtle" is found.
- Yes, the Turtle type is defined in the module turtle. Remember that Python is case sensitive and Turtle is different from turtle.
Why do we type turtle.Turtle() to get a new Turtle object?
- True
- In this chapter you saw one named alex and one named tess, but any legal variable name is allowed.
- False
- A variable, including one referring to a Turtle object, can have whatever name you choose as long as it follows the naming conventions from Chapter 2.
True or False: A Turtle object can have any name that follows the naming rules from Chapter 2.
- right turn of 90 degrees before drawing, draw a line 150 pixels long, turn left 90, and draw a line 75 pixels long
- This would turn the turtle to the south before drawing
- left turn of 180 degrees before drawing, draw a line 150 pixels long, turn left 90, and draw a line 75 pixels long
- This would turn the turtle to the west before drawing
- left turn of 270 degrees before drawing, draw a line 150 pixels long, turn left 90, and draw a line 75 pixels long
- This would turn the turtle to the south before drawing
- right turn of 270 degrees before drawing, draw a line 150 pixels long, turn right 90, and draw a line 75 pixels long
- This is almost correct, but the short end would be facing east instead of west.
- left turn of 90 degrees before drawing, draw a line 150 pixels long, turn left 90, and draw a line 75 pixels long
- Yes, the turtle starts facing east, so to turn it north you can turn left 90 or right 270 degrees.
Which of the following sequence of instructions would produce the following image?

Mixed up programs
The following program uses a turtle to draw a capital L in white on a blue background as shown to the left,
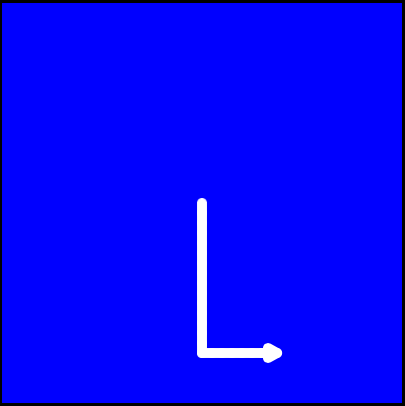
But the lines are mixed up. The program should do all necessary set-up and create the turtle and set the pen size to 10. The turtle should then turn to face south, draw a line that is 150 pixels long, turn to face east, and draw a line that is 75 pixels long. Finally, set the window to close when the user clicks in it.
Drag the blocks of statements from the left column to the right column and put them in the right order. Then click on Check Me to see if you are right. You will be told if any of the lines are in the wrong order.
The following program uses a turtle to draw a capital T in white on a green background as shown to the left,
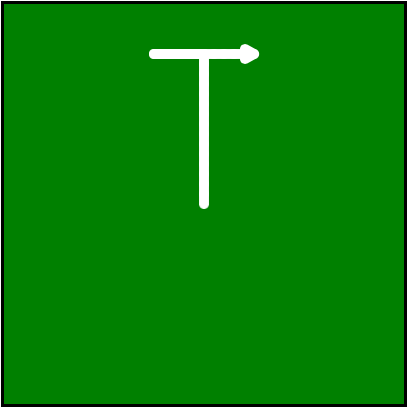
But the lines are mixed up. The program should do all necessary set-up, create the turtle, and set the pen size to 10. After that the turtle should turn to face north, draw a line that is 150 pixels long, turn to face west, and draw a line that is 50 pixels long. Next, the turtle should turn 180 degrees and draw a line that is 100 pixels long. Finally, set the window to close when the user clicks in it.
Drag the blocks of statements from the left column to the right column and put them in the right order. Then click on Check Me to see if you are right. You will be told if any of the lines are in the wrong order.